Android
The SAM Mobile Android app will work on any Android device running Android OS 4.4 or better. The SAM Mobile app will control barcode and RFID functions for multiple devices. SAM Mobile Android supports:
- Chainway RF72
- Alien ALR-H450
- TSL Sled Readers
- Atid AT911
- Invengo X-1003
- Native Android Barcode/NFC
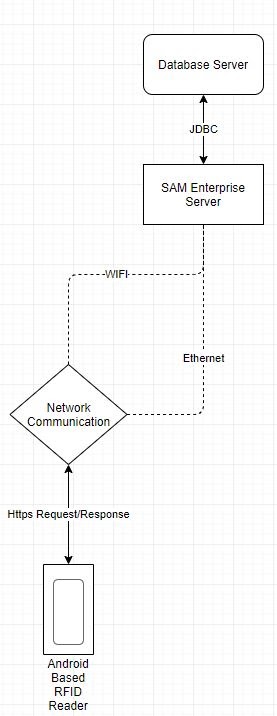
SAM Mobile on android connects directly to the application server through a defined URL. This establishes a direct SSL communication between the RFID Reader client and the server for instantaneous syncing of data in real time. There are five main screens in use by the application: Find, View, Inventory, Settings and Account.
The underlying Android device connects to the internet via WIFI, but if a direct Ethernet connection is needed, a device can be supplied that supports connecting to the network via an Ethernet adapter. If internet connection isn’t available via WIFI or Ethernet at the time of scanning and inventorying, SAM Mobile has the ability to work off the data while offline and sync the data to the server at a time a connection is established. This workflow is detailed in the Sync’ing Your Device section.
Home
Find: Choose this to simply locate any tags in the field.
View: Open this tab to view the items in the Database.
Inventory: If you wish to inventory a specific location click the inventory tab.
Settings: Settings are device specific as noted above.
Account: This will access your account page.
Help: In app help screens.
Settings
When you first login, you will need to make sure the application is properly configured. Go to the settings page and make sure the correct device is selected under “Your Device” as shown.
Once you have chosen your supported device, make sure the following settings are made for you to utilize the device. In addition to selecting your device from the is please look at these settings:
- Atid Scan Type – Barcode / RFID
- RFID Power Level – Choose between 1 and 30. The higher the number the further the read range.
- Encoding Type – Hexadecimal / ASCII If you are unsure of you tag encoding, please call for support, but this will typically be Hexadecimal.
- App URL – this is the host database for your application. If you are unsure of this entry please call support.
Once your device settings are made, simply click the BACK button to the upper left to return to the main screen.
Find
The FIND function will transmit radio waves in the field of scan. All tags that SAM III is tracking that are readable will read and list in this screen.
From this screen, you can update all assets that you’ve read based on your particular project settings. Updates can include things like Locations and Statuses.
You may read all tags and create a Report on the tags you’ve read.
You may also place these assets in a list for use at a later time.
Once you have completed functions in the FIND screen, pressing the back button will return you to the app home screen.
View
This provides an interface to view your project data. This will allow you to look through the index of all records within the database. If you have multiple projects or record types in SAM III, drop down Project to choose your record type or if you are working with a List drop down the List Menu to choose your list. If you click the Green Plus button, the detail index will open. You can use the search box to perform a simple search or click Search in the upper right for a complex search.
You can also drop down the Select Menu to choose how many items you would like to view on the screen at once.
Inventory
To perform an inventory of a specific location, physically enter the area with the device and begin a sweep, attempting to read in all items. The interface will update with the number of items found. When you believe you have all items in range, click the gear in the top right and click Run Inventory. This will send your inventory list to the server. The server will attempt to determine your location and ask you to confirm it. If your physical location does not match the location on screen, click cancel and you will be prompted to select from all possible locations.
Once you have chosen your location, the inventory list will be divided into four lists:
- All: All items scanned in by the user.
- In Location: Items in the database matching the location chosen by the user.
- Not In Location: Items which are in the database, but were not scanned in.
- Wrong Location: Items which were scanned in, but do not match the location chosen by the user.
Once your lists are built, you can use the gear icon to open the inventory functions:
- Clear: Clear the inventory and start over.
- Create Report: Report on all items found.
- Create List: Create a list of all items found.
- Update: Update the location of items in the wrong location.
- Append to List: Append your scans to an already existing List.
Use a List
In addition to the standard inventory workflow described above, you can also use the web platform to build a custom inventory list, then sweep your location for these items.
Sync’ing Your Device
You must have an internet Connection to sync you Mobile Device the project database. Go to the Settings
- Clear Data: This will clear all downloaded data from the device.
- Get Server Data: This will download data from the server
- Sync with Server: This will sync new scans since your last download back to the server.
Generally the SAM III mobile app is live updating the server as you perform operations, but if your WiFi connection is not consistent and you do not have available 4G on the device, these methods will allow you to download your data, perform inventory scanning operations and then sync your work back to the server.