Table of Contents
- Check If Tags are Reaching Server
- Empty RFID Log / No new Reads?
- I Modified the RFID Reader/Sequence Settings in SAM, but Nothing Changed/the Record Location is not Switching
- How Do I Establish a Direct Connection to Program/Manage the Reader?
Check if Tags are Reaching Server
Check to see if tags are reaching the server:
- Put a tag next to an antenna for a couple seconds, then remove the tag from the vicinity of the antenna.
- Go into the SAM 3 admin menu by clicking the gear icon in the top right.
- In the admin page, click on RFID Log in the left hand sidebar to access the RFID log menu.
- The following screen should show a log of tags read as follows:
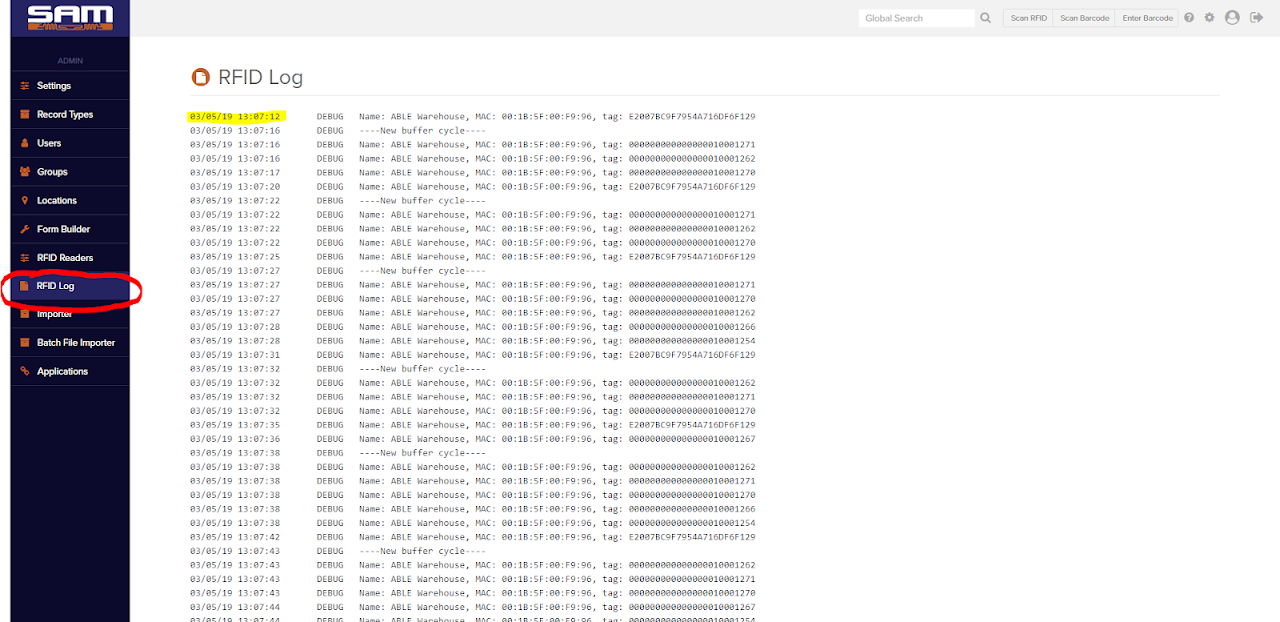
- Each read cycle is timestamped. Ensure the time matches the time in which tags were placed near the reader.
- The RFID log should refresh every 5 seconds, however to manually refresh the log you can click on the RFID Log menu item in the left sidebar to refresh the page.
Empty RFID Log / No New Reads?
Ensure rfid.enabled=true in SAM server configuration
Make sure rfid.enable=true in the server.config file. More information about server configuration settings can be found here. If this needed to be set to true, restart the SAMServer service and continue testing.
Ensure Antennas are picking up tag reads
- Login to the reader’s web interface, click on Administration, click on Tags.
- Check “Update every 5 seconds”.
- Put a tag next to an antenna for a couple seconds, then remove the tag from the vicinity of the antenna.
- Check the log to see if any RFID tags show. If the antennas are reading, it will show the RFID EPC value and the antenna number it was read on.
- If no Tags are showing, than there’s an issue with the attenuation/placement of the antenna.
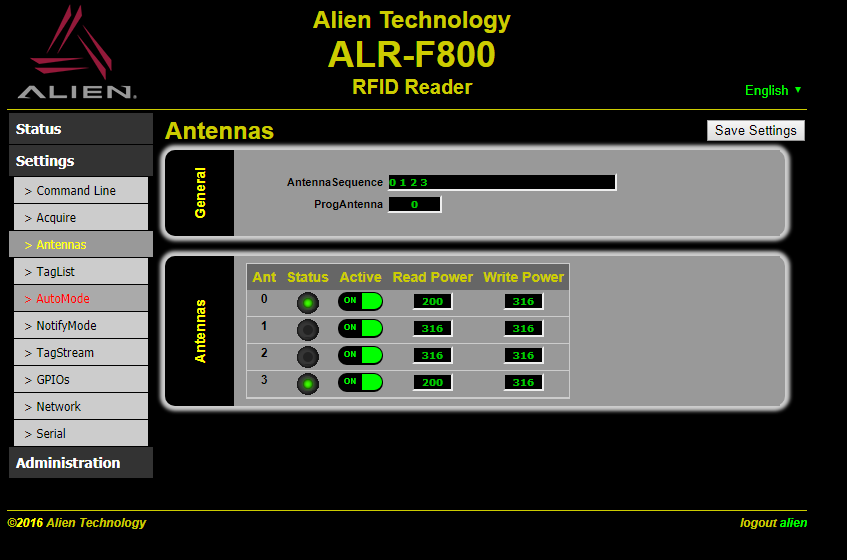
- Go into Settings->antennas.
- Under the “Read Power”, increase by 10, then click on “Save All” in the top right.
- Go back into the Tags menu under administration and place the tag near the antenna. If the tag is still not showing, repeat step b.
- If the read power is set to max but no reads are present in the tag administration screen, then contact the vendor for further instruction. This could indicate one of the following issues:
- Placement of the antenna
- Tags utilized on assets
- A broken antenna
- If SAM is set to program the reader, then the “Attenuation” parameter in the RFID Reader admin is what defines the read power. If you want to set the read power via the web interface, then refer to the Prevent SAM from Overriding Configuration section.
Ensure ports are open
- Ensure port 80 is open on the reader to ensure users within your network can access the reader’s web interface.
- Ensure that outbound port 4000 is open on the reader to the SAM 3 server IP and inbound port 4000 is open on the SAM server machine.
- To check if port 4000 is accessible within your network, run telnet 4000. If you get a timeout error, then port 4000 is inaccessible.
- If you are running SAM on Windows and have the firewall rule active but you still can’t access the server on port 4000, change the profile of the firewall rule to ‘all’ instead of just ‘private’.
- If SAM is set to configure the readers automatically, ensure that the reader’s inbound port 23 is open.
- Once open, restart the SAM 3 server. On restart SAM 3 will reach out to the readers’ IP addresses and program the readers with the appropriate configuration
Ensure Tag Stream configuration is correct
I Modified the RFID Reader/Sequence Settings in SAM, but Nothing Changed/the Record Location is not Switching
Make sure to refresh the reader by going into the “My Account” page -> “Project” -> click on the “Refresh Fixed RFID Readers” button. You should see a notification pop up shortly saying “success” alerting the user of a successful refresh. The reader should refresh automatically when it is updated, but this doesn’t occur when modifying the antenna sequences for the streamdirectionaldoorway mode.
How Do I Establish a Direct Connection to Program/Manage the Reader?
There are a few ways to establish a direct connection to a reader.
- Via a Console Cable
- Via a Direct Ethernet Connection
- Via a Local Network Connection
Below is general information on how to establish a connection to a reader from a client PC using each of these methods. For more detailed connection troubleshooting steps for the ImpinJ Speedway reader go here.
Console Connection
The Alien F800 utilizes a standard USB printer cable (USB Type A Male to B Male) for establishing a direct connection to your PC. Once connected, you can use the Alien RFID Reader Gateway software to send commands to the reader. From this software, you will need to connect via the COM port. The software should automatically locate and establish a connection to the connected device. If not, you will need to specify the COM port to connect to manually. See below for instructions on determining the COM port.
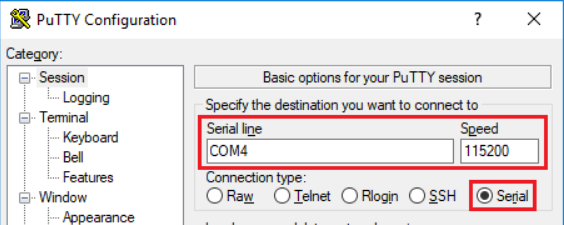
The ImpinJ Speedway reader does not connect directly via a USB console port like the Alien F800. Instead you will need a to connect to the RJ45 console port using a USB to RJ45 Console Cable like the following https://www.amazon.com/gp/product/B01AFNBC3K. Once this is hooked in, you can then access the shell through PuTTy by specifying Serial and typing in the correct COM port in the Serial Line field as shown in this example.
Once you have connected a console cable from the fixed reader to your Windows machine, you may need to find out the COM port. To determine this, perform the following:
- Press the Windows key and R at the same time. Run dialog opens.
- Enter devmgmt.msc and click OK button. If prompted, choose Yes.
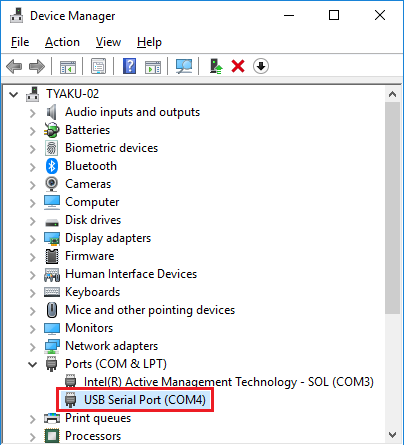
- In Device Manager, expand Ports (COM & LPT).
- Find “USB Serial Port (COMx) entry. Use this COM port number in the Alien Gateway software (Alien F800) or PuTTY’s serial connection (ImpinJ) (in this example below, it is COM4).
Once connected, you can enter in the appropriate commands for your respective reader. Please view the command reference for each respective reader linked in the additional resources section.
Direct Ethernet Connection
You may also connect to a reader through a direct Ethernet connection from the reader to your PC. Each reader has a default IP that’s assigned if no DHCP server is found and no static IP has been set to the reader. If the reader has been already set with a static IP address and you either cannot connect to the reader or don’t remember the static IP the reader was set to, you must either perform a Hard Reset* or connect via the Console Port as noted above.
The Alien F800 default address is: 192.168.1.100
The ImpinJ Speedway default address is: 169.254.1.1
Once the Ethernet cable has been connected from the reader to your PC, you must adjust the network settings on your PC to match the network/subnet of the reader if this hasn’t already been done. You will need to set a static IP of the Ethernet adapter on your machine to be on the same network.
Typically you can assign *.*.*.2 as your PC’s IP.
To do this, follow the instructions noted here.
Once connected, you can access the web administration portal (Alien F800) or connect via SSH (ImpinJ Speedway).
*THE ALIEN F800’S NETWORK SETTINGS DO NOT REVERT AFTER A HARD RESET. IF THE NETWORK SETTINGS WERE MISCONFIGURED OR YOU DON’T REMEMBER THE STATIC IP ASSIGNED, YOU MUST CONNECT TO THE READER DIRECTLY VIA A CONSOLE CABLE IN ORDER TO RESET THESE SETTINGS.
Local Network Connection
When connecting via the local network, you must first determine the IP that was assigned to the reader.
If the reader was assigned to a DHCP enabled network, the reader will automatically be assigned an IP. You will need to determine the IP address of the reader by logging into the default gateway. A identifier should be noted next to the IP address of each reader in the device. (e.g. the Alien F800 should be noted as ALR-F800). If you don’t have access to the default gateway, you will need to contact your network administrator for further assistance.
Once you’ve determined the IP, you may connect to the reader via port 80, port 23 (Alien F800) or port 22 (ImpinJ Speedway). Ensure these ports are accessible from the client PC you are using to connect.